As I’ve mentioned before, when I first began sewing, I used my friend’s grandmother’s tank of a Singer. I was so clueless then, I didn’t know how great that old workhorse was. I just wanted to learn to sew, and I used the machine I had available. At the same time, I started to dip my needle into hand-sewing and embroidery. A book on embroidery caught my eye on Amazon, and I was off to the races. The thing is, it’s really, really hard to describe stitches in words. It is, as they say, like dancing about architecture. I was completely befuddled by the drawings and long explanations of what I was assured were simple stitches that any beginner could easily master. Sigh. Me? Not so much. The only way I figured any of it out was to get myself some fabric and thread and needles and go to it. (It probably doesn’t help that I’m a lefty. But honestly, the few times I’ve come across embroidery instructions for lefties, I was even more confused!)
So, I found myself in need of this “needlebook” I kept hearing about. I didn’t have a clue what a needlebook was supposed to look like. All I knew was that all the sewing books and blogs seemed to think I had one, or should at any rate, and once I began my tentative attempts at embroidery I could see that I really did need a place to stash those needles and pins so that they didn’t end up underfoot or stuck in the couch cushions (yes, that was a painful lesson learned). So, despite my near-total ignorance on the matter, I set about designing one for myself with some scraps of fabric leftover from the first bag I ever made. My sewing has come a long way since then, but that slapdash, very DIY-looking (and not in a good way) needlebook has done its duty and it has a special place in my sewing bag as a symbol of my tendency—sometimes admirable, sometimes foolish—to dive headlong into a challenge, always presuming I can figure it out.
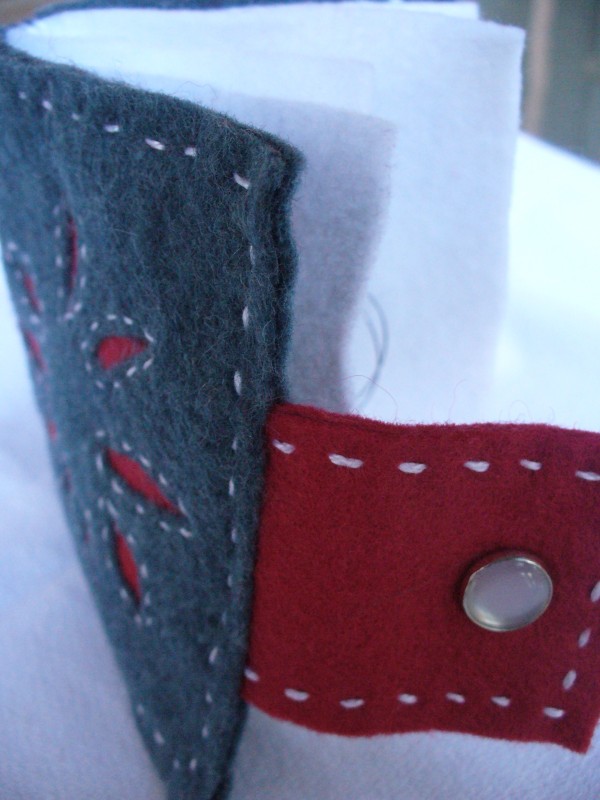
But lately I’ve wanted something a bit more stylish, and more functional as well. Inspired recently by the Alabama Chanin techniques of hand-sewing and reverse applique, I created this felt needlebook with reverse applique. It turned out really well, and so I thought I’d share it. I made two with different appliques for the cover: a wonky cross and a flower petal design. You can download one of my designs or draw your own. I’ve included the design downloads in the tutorial.
I hope you enjoy it! It’s a quick, fun project with a useful result, and a good excuse to try out reverse applique if you’ve never done it.
Get the complete tutorial:
Reverse Applique Needlebook Tutorial